Stürzen wie ein Profi - Mit den Tipps und Tricks unseres Teamarztes gut gerüstet für den nächsten, schmerzhaften Gruß vom Asphalt

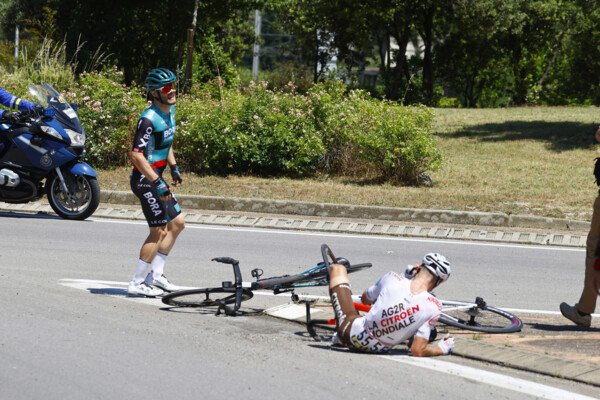
Stürze gehören für Radprofis zum (unfreiwilligen) daily business. Schmerzhafte Nächte, schlechter Schlaf, Wunden die an Kleidung und Bettwäsche festkleben und jeden Morgen frische Verbände. Die Profis genießen nach einem Sturz umgehende und erstklassige medizinische Betreuung. Was aber, wenn die abendliche Ausfahrt nach dem Tour TV-Krimi anstatt im Biergarten ganz unvermittelt auf dem harten Asphalt der Lieblingsrunde endet? Für alle Feierabend-Rennfahrer und Helden des Wochenendes die unfreiwillig zu Boden gehen: Mit der Checkliste und den Tipps & Tricks unseres Head of Medical Christopher Edler seid ihr bereit für den Notfall und hoffentlich schnell wieder auf dem Rad.
Die Beine sind super und die Uhr verspricht eine richtig schnelle Zeit für die altbekannte Feierabendrunde. Doch plötzlich diese eine Kurve: Noch nass vom letzten Gewitter und der Schotter am Scheitelpunkt kommt jetzt auch ziemlich ungelegen. Das unangenehme Geräusch von seitwärts rutschendem Reifengummi gefolgt von einem harten Aufprall. Bevor man realisiert was passiert steht das Rad still und anstatt der Wattzahlen am Tacho erblickt man leicht verschwommen den Abendhimmel. Autsch!
Das Wichtigste zuerst:
Am wichtigsten und als aller erster Schritt: Der Check bei sich selbst oder dem gestürzten Kumpel. Ist es nur ein wenig Haut auf der Straße oder liegen doch schwerwiegendere Verletzungen vor? In erster Instanz gilt es Brüche und Kopfverletzungen auszuschließen.
Aber wie?
- Lässt sich der Nacken in alle Richtungen frei bewegen? Vorsicht hierbei!
- Können die Arme frei bewegt werden?
- Ist es möglich schmerzfrei und tief einzuatmen?
- Den Bauch abtasten - liegen dabei Schmerzen vor?
- Kann man aufstehen und sich uneingeschränkt bewegen?
Sollte einer dieser Punkte mit "Nein"beantwortet werden müssen, bitte umgehend einen Arzt aufsuchen!
Beim Sturz auch den Kopf gestoßen?
Stürze auf den Kopf sind generell schwieriger einzuschätzen, speziell wenn man alleine unterwegs ist. Mit der folgenden Checkliste kann schon mal grob evaluiert werden, ob es sich unter Umständen um mehr als nur einen Brummschädel am nächsten Tag handelt.
- Den Helm auf Dellen oder Brüche untersuchen
- Starke, ungewöhnliche Kopfschmerzen, Schwindel oder Übelkeit?
- Probleme mit der Balance?
- Verschwommene oder nicht ganz klare visuelle Wahrnehmung?
Aus medizinischer Sicht sind all diese Punkte „Red Flags“. Liegt eines der Symptome vor - Notruf statt weiter fahren!
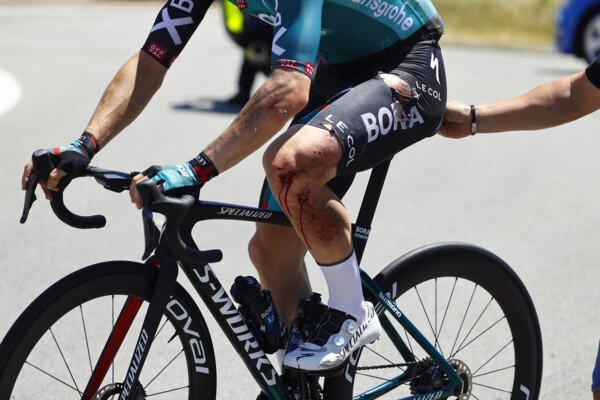
No bruises, no story
Prellungen und Abschürfungen sind jene Verletzungen, die zu fast jedem Sturz gehören. Während der Aufprall am Boden für die Prellungen verantwortlich ist, so sorgt das Weiterrutschen des Körpers durch die meist hohe Restgeschwindigkeit für die oftmals großflächigen Schürfwunden. In den allermeisten Fällen kann nach einigen Tagen der Wundheilung schon wieder in die Pedale getreten werden. Prellungen und Abschürfungen vergehen, die Geschichten von kühnen Stürzen aber bleiben und sorgen bei der nächsten Feierabendausfahrt mit Sicherheit für Gelächter.

Mit dem PRICE-Konzept Prellungen behandeln und den Prozess der Rekonvaleszenz beschleunigen.
Protection: Hauptsächlich im Sinne der Entlastung und dem Schutz vor neuen, schmerzhaften Belastungen. In schweren Fällen können Krücken oder Armschlingen zu Entlastung der Extremitäten nötig sein.
Rest: Die Verletzung benötigt Zeit zur Heilung und hierfür die notwendige Ruhe. Nur flach im Bett liegen und auf Besserung zu warten ist allerdings nicht sinnvoll. Vielmehr sollte es eine aktive Erholung sein, bei der die betroffenen Körperpartien geschont werden. Leichte und im Rahmen der Verletzung mögliche Bewegung fördert den Regenerationsprozess.
Ice: Der Kühleffekt wird genutzt, um speziell in den ersten Minuten Schmerz und Schwellung an den betroffenen Stellen zu reduzieren.
Auch wenn ihr auf dem Rad höchstwahrscheinlich kein Eis zur Hand habt, kühlen ist auch später Zuhause noch sehr wichtig. Die Auflage einer Kältekompresse für zehn Minuten im Abstand von zwei Stunden zeigt allgemein eine sehr gute Wirkung. Wichtig hierbei ist, zwischen Haut und Kältequelle ein dünnes Handtuch zu legen, um die Haut zu schützen. Dass die Haut während und nach der Kühlung rot wird ist ganz normal, sollten aber Schmerzen durch die Kühlung auftreten, dann unbedingt eine Pause einlegen, die Kompresse etwas erwärmen lassen und ein dickeres Handtuch zum Schutz der Haut verwenden.
Compression: Hier wird meist mit elastischen Bändern oder Kompressionsbekleidung gearbeitet, um Schwellungen zu reduzieren. Die Verwendung von elastischen Bändern zur Kompression ist allerdings nicht ganz trivial und erfordert eine bedachte und sorgsame Handhabung. Die Kompression sollte immer ein Stück von der Verletzung entfernt beginnen und sich dann zur Körpermitte hin orientieren. Die Wicklung der Bänder erfolgt dabei spiralförmig. Es braucht etwas Erfahrung, um ein Gefühl für die Intensität der Kompression zu bekommen. In jedem Fall aber dürfen dabei keine Schmerzen oder Taubheit auftreten!
Elevation: Um die Ansammlung von Flüssigkeit und dadurch resultierende, zusätzliche Schwellungen zu verhindern, ist die Hochlagerung ein essentieller Teil der Erholungsphase. Speziell in den ersten beiden Tagen nach der Verletzung kann so die Schwellung gering gehalten, die Regeneration gefördert und die Wiederherstellung der Bewegungsfreiheit beschleunigt werden. Generell gilt: Zur Hochlagerung sollte die betroffene Extremität über dem Herz/Körpermitte gelagert werden.
Das PRICE Konzept ist ein simples Rezept, um Schwellungen und Schmerzen zu reduzieren und den Heilungsverlauf zu beschleunigen, ohne dabei auf viele Hilfsmittel angewiesen zu sein. Falls nach einigen Tagen noch keine Linderung erkennbar ist, so sollte ein Arzt aufgesucht werden, um schwerwiegendere Verletzungen auszuschließen.
Haut auf der Straße?
Falls die Wunde stark blutet und nach einem tiefen Cut aussieht, dann ist es ratsam, die nächste Notaufnahmen auszusuchen, um die Verletzung zu säubern und gegebenenfalls auch zu kleben/nähen.
Liegt eine gewöhnliche Abschürfung und somit eine Verletzung der obersten Hautschicht vor, kann diese ohne professionelle medizinische Versorgung Zuhause behandelt werden. Wichtig ist die Wunde gründlich und regelmäßig zu reinigen, um das Risiko von Infektionen zu reduzieren.

- Die Wunde spülen und somit oberflächlichen Dreck entfernen.
- Die Wunde muss nicht ausgebürstet werden, sollte aber zumindest mit einem sterilen Tuch ab- und ausgewischt werden.
- Nach der Reinigung der Wunde folgt die Anwendung eines antiseptischen Sprays oder - noch besser - einer antiseptischen Creme. Inhaltsstoffe wie Polyhexanid oder Chlorhexidin zeigen bei der Behandlung von Wunden sehr gute Resultate. Auch wenn bereits etwas veraltet und nicht mehr ganz „state of the art“, jodhaltige Salben sind nach wie vor im Umlauf. Besser als nichts falls kein anderes Antiseptikum verfügbar ist.
- Verwendung einer sterilen Wundauflage oder Gaze, um die Abschürfung abzudecken. Zwischen Wunde und Verband eine nicht haftende Schicht, z.B. Adaptic oder Lomatüll legen, damit beim Abziehen nichts an der Wunde kleben bleibt.
- Häufiger und regelmäßiger Verbandswechsel! Bei der Verwendung einer antiseptischen Salbe ist ein täglicher Wechsel erforderlich, ebenso nach sportlichen Aktivitäten.
- Auf Anzeichen einer Infektion achten! Sollte sich die Haut rund um die eigentliche Verletzung röten, die Wunde nach zuerst gut verlaufender Heilung plötzlich zu brennen beginnen oder sogar geschwollene Lymphknoten spürbar sein, dann bitte medizinisches Fachpersonal aufsuchen. Ein seltenes, aber sehr ernst zu nehmendes Alarmzeichen ist Fieber - in diesem Fall sofort einen Arzt kontaktieren.
Verheilen Wunden über längere Zeit sehr schlecht, bleiben Schmerz und Schwellungen über mehrere Tage unverändert, ist generell keine Besserung der Gesamtkonstitution erkennbar, dann sollte in jedem Fall ein Arzt konsultiert werden.
Enjoy your ride and stay safe,
Christopher Edler